

After the Edward J. Snowden relieved the enclosed document of the National Security Agency to the public, the privacy term became a big concern for everyone. Today the New York Times published an article about N.S.A. and its ability to break the basic safeguards of privacy on the web. According to the news and the new documents provided by Snowden, the N.S.A. has been cracking password of million of the Internet users and accessed their emails, personal data, web searches, and even their medical history. It seems the agency in partnership with GCHQ, uses custom-built superfast computers to break codes and hacked into the targeted computers before their sensitive information were encrypted.
We are investing in groundbreaking cryptanalytic capabilities to defeat adversarial cryptography and exploit Internet traffic,” the director of national intelligence, James R. Clapper Jr.,
If you like your privacy and want to know how to encrypt your emails before you send them to the receivers, then in this article I will show you how to do this step by step. The process of encoding information or messages in a way that only certain people with access key are able to read them is called Encryption. The encryption key must create and provided by you and give to the person who you would you like to read your message. Encrypting your sensitive data and email is a good practice not only to prevent government, hackers or even your family sneaks to your personal information. You may want to send some sort of email to your colleague containing sensitive information about the company. You need to encrypt it first and then send it to your colleague who knows your public access key and can use it to read your email. But you have to keep in your mind, encrypting your email may lead you to become a target for N.S.A. as they would think you have something to hide. According to the enclosed documents, N.S.A. keeps encrypted data on their server to ensure that they actually able to read the information containing in the messages. So unless it is necessary for you to encrypt your messages, you should avoid it.
In this tutorial we will use the PGP (Pretty Good Privacy) technique and some free and open source application to encrypt an email. You can use this technique for any email service provider such as Yahoo or Gmail. As the name Pretty Good Privacy (PGP) suggests, it is the process of encrypting and decrypting data that provides cryptographic privacy for communication. What you need is the Thunderbird (a free email application), an add-on called Enigmail, and GNU Privacy Guard (GnuPG). Just follow these steps:
Step 1
First of all go to the link below, download and install the GNU Privacy Guard on your system. During the installation make sure to select the GPA option. This option will include GNU Assistance Privacy key to your installation.
Or download for the GNU Privacy Guard website.

Step 2
Now download and install Thunderbird on your system. Open the Thunderbird, and add your email account. Creating a new account on the Thunderbird is quite easy and straightforward. For this tutorial, I am using my Gmail account but you can add any mail service that you want to use. After creating your account, go to the Enigmail, download and save it on your local machine. In the Thunderbird interface, from the menu, navigate to the Add-on section. Click on the small gear icon on the top of the page and then select Install Add-on From File, add the Enigmail extension and restart the Thunderbird. You will be able to see that the OpenPGP option has been added to the menu.
Or download from the Thunderbird website.


Step 3
Go ahead and from the OpenPGP option, choose Key Management and then in the Key Management dialog box, from the menu go to the Generate>New Key Pair. What we need to in this section is to create a Private and Public key in order to encrypt our email. The Private key is the key that you keep it to yourself and don't share it with anyone. The Public key is the key that you give to the receiver who you want to send the encrypted email. With the public key the receiver will be able to decrypt your message and he or she must also use PGP.

Step 4
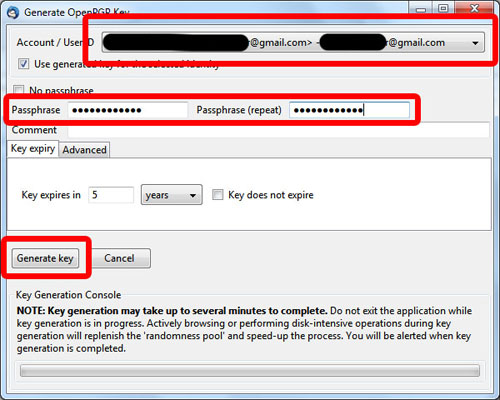
In the Generate Key window, select your email account and fill the Phrase (Password) for your keys. Remember to create a strong Phrase for your keys. You will need this password for encryption or decryption your emails in the future. Hit the Generate button and it will ask you for Revocation Certificate, enter your password again and you are done. Your keys will create and save on your system. As you can see in the figure the revocation certificate that we have made at the end of this process can be used to invalidate your public key in case you lost it or it has been compromised.


Step 5
To use your new generated keys and see them in action, let create a new email. For this example, I am going to compose a new email with my Gmail account and send it to my other mail on Yahoo. For testing the encrypted message, I have already configured the PGP settings for my Yahoo mail with a
new pair of keys, but you can use the same key for multiple email accounts also. Click on the Write a new message in the Thunderbird interface. The compose (Write) window will pop up, fill the required fields such as the receiver address (in my case, my Yahoo account), Subject and the body of the letter (email). Click on the OpenPGP button and then select Sing message and Encrypt message options. After that, hit the Send button, the PGP will ask for your phrase. Enter your password and your email will encrypted. The encrypted message would be something like the figure below:


Step 6
Now let assume that I am the receiver and got this encrypted email. As I mentioned earlier, in order to able to decrypt and read the message, I must have the GnuPG installed on my system as well. The sender Exported his public key (using the OpenGPG Key Management option) and shared it with me as a .asc file. All I have to do is to open the Key Management and Import the key to my settings. Now when I open the mail, the PGP will ask me to enter my phrase (password). As I have already imported the sender public key, I just enter my own password and the message will be visible to me. In short, sender exports his public key on his/her local machine, shares it with the receiver (through email, flash memory etc.) and the receiver imports the sender key to the PGP. The email will be decrypted automatically by the Thunderbird. The OpenPGP Key Management File menu also includes the Send Public Keys by Email option.


Before I finish this tutorial, I have to mention that using this technique, you can encrypt your message as well as any file that you attach to the email. Also keep your private and public keys (especially the private key) in a safe location and do not share them with just anyone. I hope that this tutorial was helpful for you. In the future I will publish more articles about the encryption techniques.
 Tag
Tag

 Home
Home Privacy Policy
 Contact
 About
About
 Powered by Blogger.