In this tutorial I will show you how to create a bootable flash/pen drive to install Windows XP/Vista/7 or any Linux operating systems. There might be several reasons that you want to make a bootable pen drive, but I think the common and the major reason between all users is their CD or DVD drive isn’t working properly.
Before I start you should know that not all the computers are able to boot from a USB flash drive. The new computer models or those that manufactured within the last two years are mostly capable of booting from a USB pen drive. For the older systems or motherboards, maybe be after updating the BIOS, the PC will be able to boot from a pen drive. Just remember backup your PC’s BIOS before you update it. In Some BIOS the flash drive name is referred as a USB floppy or USB zip. Also the USB pen drive must contain the boot or system files.
The other thing is the pen drive you are using. It should have the booting ability, because not all of them support booting process. For Win 7 or Vista you need 4+ GB and for XP 2 GB flash drive.
Remember for making a bootable XP pen drive, it cannot be larger than 2 GB. Because you need to format the pen drive using the Fat-16 file system.
I am going to teach you step by step two methods to make a bootable pen drive. The first method only works on Win 7 or Vista and the second method works on all Windows versions include XP and Linux also:
Making the Win Vista/7 bootable pen drive
Step 1
Plug your USB to the system and go to Start>All Programs>Accessories>Right-click on Command Prompt and select Run as administrator. When the Command Prompt is opened, enter the following commands:
DISKPART
LIST DISK
After you enter the LIST DISK command, it will show the disk's number of your USB drive.
Step 2
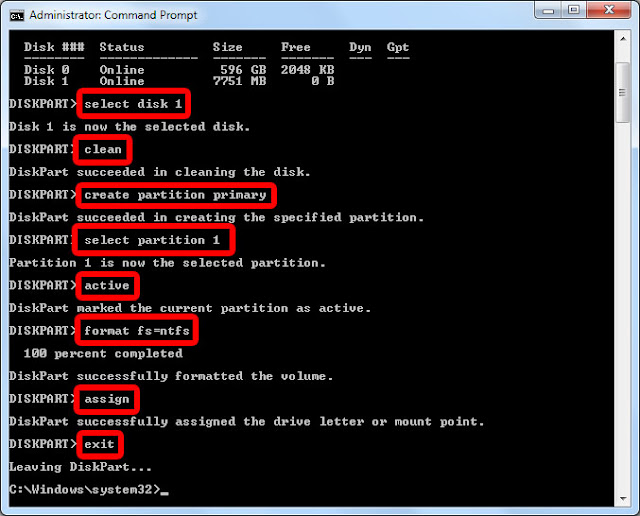
Enter all the commands below in the exact same order (in the first line, instead of "1", write your USB drive's disk number):
Minimize the command prompt window and continue with the step 3.
Step 3
Insert your Windows DVD into the DVD Rom and check your DVD and pen drive letters. Go back to the CMD and navigate to the Windows DVD drive and then boot directory where contains the bootsect file. My system DVD drive letter is "H" and for the pend drive is "L", so I have to type:
h:
cd boot
Now enter the command below to use bootsect.exe file and make the USB as a bootable NTFS drive for Windows 7 or Vista.
Step 4
Exit from the Windows Command Prompt and copy all files and contents of Windows from the Windows DVD into your pen drive. Your job is done and now you can boot your system from the pen drive.
Next you need to change the boot setting in the System BIOS. Do not unplug your pen drive from the computer and restart your systems. Enter the BIOS setup menu (when the PC start booting, press Delete or F8 key to go to BIOS menu) and change the boot device setting. Select USB device as first Boot device in the boot device menu.
Note: This method will not work if you want to make an XP bootable pen drive.
Making Win 7/Vista/XP/Ubuntu(any Linux version) bootable pen drive
In this method we use two utility software "WinToFlash" and "Rufus" to make a bootable pen drive. Both of these programs are freeware applications that convert your USB drive to a bootable drive.
Using WinToFlash
Step 1
Plug your flash or pen drive to your PC and download WinToFlash from the link below or from the WinToFlash official website.
Step 2
Run the program (no installation required), then click on the Windows Setup Transfer Wizard button. In the Wizard window, press Next and then in the next window, specify the location of files and drive (DVD ROM and USB). After you entered the paths of your Windows files and USB drive, click on the Next button.
In the Advanced mode tab, you have more options such as transfer Windows XP or 2003 to a USB drive or create Windows XP emergency bootloader USB drive.
Using Rufus
Step 1
Again connect your flash drive to the system and download the Rufus from the link below or the Rufus official website.
Step 2
Run the program (no installation required), select Device, File system and specify your ISO (image) file. For using the Rufus, you need to have an ISO file of the operating system that you want to create a bootable USB for it. There are lots of applications available over the Internet that convert a DVD/CD to an image file (just Google it).


 Tag
Tag

 Home
Home Privacy Policy
 Contact
 About
About Powered by Blogger.